|
In addition to my own remodel projects, I started offering design consulting last year. I received an email from Kassie who found me through the blog, it turned out she lives in my hometown and she was wondering if I could help her with her kitchen. Our first meeting took place in November in her 1980s kitchen, Kassie and her husband David hated it so much and wanted to transform their U shaped kitchen space into one where they could cook and entertain and they were anxious to get started. Kassie wanted a look that white light and bright and modern and with patience and planning, she got what she wanted! The remodel took six months and I’m so happy to be sharing the final result with you today.
Here’s a glimpse of the range side of the kitchen, before and after. Note the dated oak cabinets and tile countertops that were way overdue for an update! It’s such a striking difference!
The first thing they tackled after demolition was installing the new flooring. Kassie and David went back on forth on various options but finally decided on vinyl plank product in a deep wood tone that grounds the space especially with all the white surfaces, wise choice! Kassie and David worked with Home Depot’s kitchen cabinet designer and placed an order for Kraftmaid shaker cabinets in White Dove and white quartz countertops. If you scroll back to the before image you’ll notice the kitchen range was off center. It was too close to the kitchen entry which was awkward for anyone cooking and aesthetically off balance. I suggested as part of their new cabinet plan that they center the range on the wall. It required having a plumber move the gas line over a foot, but it was worth it to center the range to give the chef more personal space and to make this wall more visually pleasing. Kassie & David chose a streamlined stainless steel hood with curvature. It’s always a good idea to introduce rounder shapes whenever possible in a space where everything else is angular. This range hood is visually less bulky because of its tempered glass. Note they moved the microwave over to the peninsula (seen below) where it’s hidden inside a cabinet.
I’m a huge advocate for slide in ranges instead of freestanding ones because the back of the range follows the line of the countertops and shows off more of the tile, they’re more expensive but totally worth it for that reason.
Here’s an image of the kitchen’s window wall before the remodel, note the placement of the sink under the garden window and the dishwasher to the right. I recommended they get rid of the rarely used slider since there is access to rear yard through the adjacent garage. I suggested they reframe the wall with a window that was centered, larger, wider, and rectangular to bring in more light and also symmetrical on the wall. Then center the sink and flip the dishwasher over to the other side. After our meeting, Kassie sent me this picture with the painter’s tape suggesting where a new window would be in the new kitchen. Yep, exactly!
Reframing a new window meant removing the odd upper cabinet and sliding door and completely reframing the wall but they were totally on board and they did it and the difference is amazing!! I’m a firm believer in installing tile to the ceiling whenever it makes sense, which it absolutely did here. In the original kitchen, the refrigerator sat next to the pantry and visually blocked the kitchen space from the dining room, you can see a peek of it next to the pantry in the image below. I recommended the fridge be moved to the blank wall and framed in, an idea they had also thought of as better placement for the refrigerator.
Kassie and David opted for a more shallow counter depth model and framed it in so that it created a mini corridor when entering the kitchen. Amazing difference, right?
Wherever you place a refrigerator, there always needs to be clearance for the doors to fully swing open, something to pay attention to with any cabinet design plan. In this kitchen there is plenty of clearance on both sides.
With the refrigerator moved, there was room for a nice peninsula that looks out to the adjacent dining space. The large quartz countertop provides room for two people to sit comfortably on a stool on the other side and it also hides the microwave.
Because the cabinets and countertops were white, I recommended they add small doses of black to their kitchen with a black light fixture above the sink and matte black pulls. Both add the perfect amount of contrast.
They surprised me by adding yet another element of dark contrast, the dark granite sink. In the beginning, they had planned on keeping their original stainless sink but swapped it for this granite version instead, fantastic choice! Don’t you love this two tone single hole faucet, that touch of cinder gray perfectly matches the sink.
Kassie had her heart set on hexagon marble backsplash so I said girl, go for it! Marble hexagons are classic and the smaller scale is just right for a backsplash in a kitchen of this size.
For lighting, they substituted six 4” recessed lights where the old florescent box used to be, the smaller size recessed light is a better choice with a lower ceiling. I was so impressed to learn that David and David’s brother did most of the work themselves! With patience and great attention to detail, they installed the flooring and the cabinets! They hired countertop fabricators, and also help to install the backsplash but the rest of the work was DIY – amazing! Congratulations Kassie and David on your light, bright, and modern kitchen renovation! Thanks so much for hiring me as your design consultant, it was a pleasure working with you! For those in Northern California, I now offer kitchen and bathroom design consulting services, see my portfolio page for how to arrange an introductory meeting. kitchen sources: cabinets: KraftMaid Shaker in Dove White / countertops: Silestone in Eternal Statuario flooring: cortec in smoked rusted pine / refrigerator: kitchen aid counter depth dishwasher: kitchen aid in stainless steel / range: kitchen aid slide in range backsplash: honed hexagon carrara / hardware: TobKnobs Noveau III in Flat Black sink: Blanco Granite undermount in cinder / faucet: Blanco Sonoma in stainless + cinder sink light: hailey semi flush mount . from https://centsationalstyle.com/2018/07/kassie-davids-kitchen-remodel/
0 Comments
Hello sweet friends, happy summer weekend. I’ve been a keeping myself occupied with various things this past week, squeezing in extra fitness classes, trying a new art project, assembling cabinets for my DIY desk idea, and photographing a client’s kitchen that I helped shape as her design consultant. I’ll have that space to share with you this week, it’s quite a transformation. In entertainment news, I am binge watching The Paradise on Netflix, so far I love it, I just started Season 2. It’s a well done BBC series with great characters and a good storyline. I’m also enjoying the lull of late July, with the whirring of the fan coaxing me to sleep at night, and the sunlight poking through the blinds waking me up instead of an insistent alarm clock. It’s a blissful time of year before the routine of a school schedule returns, and I’m soaking it all in. The early morning hustle will be here all too quickly. Favorite links: This may very well be the most photogenic hotel in the desert. A Georgia home designed for hospitality in a black & white palette. Cool DIY: this quilt pattern painted floor. Who else feels this way about young boys and gaming? No company required: 21 ideas for things to do by yourself. Change one word you utter to change your attitude. 10 European train routes that are faster than flying. Road trip idea: sampling the best BBQ in every state. One couple visited every national park, and rates them all. .
from https://centsationalstyle.com/2018/07/weekend-reading-166/ Brno is the second largest city in the Czech Republic and I’ll admit, it was not on my list of places I wanted to visit in Europe, but my darling friend Ingrid calls this city home, so when I told her I was coming to visit the Czech Republic she insisted I come to Brno to see her. Ingrid and I met in a fitness class and she knows my favorite things include cool European cities and beer gardens. I could claim she lured me to her city but the truth is I went willingly like a moth to a flame. To me, Ingrid is a modern day Zsa Zsa Gabor with her love of dressing up, her upswept blonde hair, and eastern European accent. I adore her. On our first day of exploring, she insisted on an authentic lunch at Stopkova in the main part of town dining on goulash and beer, but of course! Brno was a stark contrast to what I experienced in Prague, there were no rows of tourist shops or massive crowds of people. In fact, I don’t recall seeing many tourists at all, just the Czech people living their lives and going about their day. Brno has a slower pace than Prague and a relaxed pulse that I welcomed. We didn’t use public transportation, we walked everywhere, it’s my favorite way to explore. Brno is a small city and easy to get around on foot, but there are trams and bicycles for getting around in town and trains and buses that will take you anywhere on the outskirts of the city.
Moravian Square is the central part of downtown and one of the largest squares with a curiously oversized equestrian statue.
Keep walking and you’ll hit Freedom Square, the main place where the people congregate, listening to music and sunbathing next to the fountain.
Cities have palettes that reveal themselves as you stroll the avenues. I spied sunlit hues in Provence and rich reds and yellows in Bergen. Here in Brno, the buildings were coated with pastels: mellow yellows, apricot shades, light greens and blues, and brick reds with plenty of patina.
Brno is similar to other European cities in the way its pubs and restaurants are neighbors with incredible buildings with distinctive facades. Here too, outdoor cafes are a way of life and locals linger with friends over long lunches and dinners.
When in Czech, you must eat the local authentic food. I ate goulash several times and also my share of schnitzel and fried cheese, and the local sweet treats. There is no such thing as a diet when I’m traveling, which is why I walk everywhere. ;) The Czech Republic is renowned for its beer so I did my part and sampled plenty of the local brews. I was never disappointed.
As you walk toward the castle, you’ll find a square Zelný with a Baroque fountain, it is quiet on the weekends but becomes a lively farmer’s market during the week.
On weekdays at Zelný (Vegetable Market) you’ll find vendors selling fruits, vegetables and flowers. There is a labyrinth under the Vegetable Market that leads to unique and mysterious places, including medieval cellars (we didn’t visit, but I had to mention).
I like to study the labels in a feeble attempt to learn a few new words, using the flowers and vegetables as clues.
We came across a coffee cart managed by volunteers and motivated by good will. It was a pay it forward concept, vow to do a good deed in exchange for a free coffee, an easy trade.
Hrad Spilberk is the castle on the hill the surrounding grounds are scenic and serene and you get panoramic views of the city below.
The castle was once a fortress and then became a jail, you can tour the cells of the former jail and there are mannequins inside dressed as prisoners for effect. I avoided posting a picture to not freak out anyone scrolling through this article but I uploaded this image if you want to see what I mean! The vaulted passageways are said to house terrifying stories, it felt haunted! (We were so scared but the mannequins were funny and we couldn’t stop laughing.) We also visited the second largest ossuary in Europe at the Church of St. James near the main square downtown. It’s open for public viewing, there you’ll see skulls and bones arranged in a damp underground crypt. Walk through it while listening to classical music composed especially for visitors. I’d never been in an ossuary before, that was a new experience. I’ll spare you the skull and bones pictures, you’ll just have to go and visit for yourself. ;) During my three day stay we did so much more. We visited beautiful cathedrals and we drove out to a lake to visit the beer gardens, then watched the boats sail by at sunset while we ate a dinner of fried cheese and beer.
People in Brno stay up late. Street musicians entertain the people buying beer until well after midnight from breweries across the street from centuries old churches. On our last night we met up with more friends and shared drinks at a rooftop bar.
Ingrid’s friends spoke Czech 98% of the time. I watched them tell stories and while I didn’t understand a word I still knew what they were saying. Time spent out on the town with your tribe of friends is no different in Brno than here in the States, we all want the same things, laughter and connection. As the sun set on Brno I knew it would be some time before I returned, but went to bed with a smile on my face. Three days before, I was a stranger to this city, but I dosed off with new found fondness in my head and heart for another spot on that European continent I so love exploring. from https://centsationalstyle.com/2018/07/three-days-in-brno/ This week we’re excited to share a lovely princess themed party from Sarah at SurreyMama. Here’s what Sarah has to say about her daughter’s 4th birthday party!
Amelie has three things she would love to be, a Princess, a Mermaid or a Fairy so when I asked her what kind of party she’d like this year I wasn’t sure which one we’d be having… She chose a Princess party so with the help of Party Pieces who have what I think are the best range of decorations we ordered and were so excited to look through everything that would bring Amelie’s Princess Party to life.
On the day of the party Amelie was keen to help with the setup, she desperately wanted to blow up the balloons and help hang the decorations, she was just so excited to see everything come together! Amelie’s birthday falls in July and it’s usually warm and sunny, this year even more so than any other birthday so we were absolutely fine with our bets for a garden party. We decided to use half the decorations outside and the other half inside around and on our kitchen table where the party food and Amelie’s cakes would sit.
The party theme was a Princess party so I used some of the inspiration and products in the Party Pieces Princess section which were all a pale pink and then added rose gold accessories and decorations.
On the main party table I used a plain white table cloth we already had and then added the decorations. We added Princess wands, party hats in rose gold and Princess cups, plates, napkins and matching paper straws. I baked some pink cup cakes and used some beautiful cake toppers which were a mixture of Pom Poms and pretty dresses all made out of a tulle material.
Behind the table we had a giant four balloon in rose gold which looked stunning next to all the pale pink and a bunch of pink balloons inflated with helium the other side. We had a lot of balloons at the party, they are Amelie’s favourite thing. She especially loved the confetti balloons that looked like huge bubbles with pink glitter inside.
The girls had been busy making unicorn balloons with a super kit from Party Pieces so these were played with before the party started and displayed around the living area.
Outside we had a rose gold ‘happy birthday’ balloon on our main wall surrounded by the confetti balloons and a giant pink balloon. As guest arrived into our garden there was a giant pink banner from the Princess range personalised with ‘happy birthday Amelie’.
Party Pieces also have lots of party entertainment, we chose a pink piñata which the children loved! I’ve never seen such excitement.
We had a wonderful birthday party for Amelie and everyone had a brilliant time. I loved the mixture of the rose gold and Princess decorations and all the little ones were thrilled with their Princess party bags filled with goodies.
What a lovely party! You can follow Sarah on Instagram & YouTube. The post Real Party: Amelie’s Princess Party appeared first on Party Pieces Blog & Inspiration. from https://blog.partypieces.co.uk/real-parties/real-party-amelies-princess-party/ If you want to reveal your baby’s gender in a giant way, look no further! Host the ultimate gender reveal party for your friends and family with our top five picks.
The post 5 Favourite Gender Reveals appeared first on Party Pieces Blog & Inspiration. from https://blog.partypieces.co.uk/themes/baby/gender-reveal/5-favourite-gender-reveals/ I’m finally building that window desk as a place for my teens to do homework, and I’m starting with these IKEA cabinets as bases. I have a great idea for how I plan to make the 10 foot wide DIY desktop that I can’t wait to try. I’m not ready for the words “back to school” quite yet, it’s only July, but I want to be ready by the time since mine start in August so this project has moved to the front of my priority list. My idea is to create a desk similar to this one below, with a long desktop set on top of two cabinet bases, but my idea is different for the top. via shift interiors
There are a lot of ways to build your own desk, with plenty of ideas to be found around the blogosphere, here are a few more of my favorite build your own desk ideas:
ikea tabletop & painted wood leg desk stacked flip top plywood & hairpin leg desk butcher block top & pipe leg desk
L shaped wood top with X base desk
wood top sawhorse leg + center drawer cabinet desk
Inspiring ideas for setting up a desk space anywhere in the home! from https://centsationalstyle.com/2018/07/creative-diy-desk-ideas/ Hello and thank you so much for leaving the kindest comments ever on my last post about my friend. I loved reading about all of your daily rituals and simple treasures, thank you again for sharing. I’m spending a lot of time with her family right now, thank you for your patience and the slower pace around here. Some favorite links from the past week . . .
This is a lovely and light lakeside cabin. If you love the farmhouse style, tour this “white done right” home. The difference between duvet covers, coverlets, and quilts. Ashley rounded up some great sources for wallpaper. An honest look at tiny house living. Emily shared clever & stylish ideas for built in bunk beds. Inspiring DIY: this rattan chair IKEA hack. Isn’t this a beautiful map of France? Dreamy & affordable Airbnbs in Italy. Instagram and self promotion: is humility dead? Screens and their effect on our children’s moods.
from https://centsationalstyle.com/2018/07/weekend-reading-165/ I feel like I’ve been kicked in the gut. For the past 11 days, I have traveled back and forth to the hospital checking in on my dear best friend. Nine months ago, she was diagnosed with Stage IV colon cancer. She’s had rounds of chemo and surgery but today she received word that there is no cure. I won’t go into the details, but based on her condition, and the rate the cancer has spread, we’re at that point where we’re praying for a miracle but also facing a devastating reality. My heart is broken. Between the interruptions of doctors and nurses and procedures we talk about the little mundane details of life. I held her as she cried, just wishing she could be in her kitchen doing morning dishes or folding her laundry. She had been robbed of joys as simple as daily household tasks. Her home is small but cozy, she lives with her three kids and husband in 1,000 square feet, and she’s made it so special. Everything is beautiful, and it all serves a purpose. Her velvet sofa and two side chairs are where her family gathers to watch movies. Her home is painted in warm shades, and is layered with wood furniture, soft patterned pillows, lovely dishes and artwork, and reminders everywhere of a happy home. She inspires me in the way she has decorated her home and the way she lives her life. She keeps an incredibly clean and organized home, but still indulges her ten year old daughters in their love of two parakeets that chirp all day in the living room, and shed feathers all over the floor. She drinks rosé in summer because it reminds her of our girl’s trip to Paris. She doesn’t bother with a Facebook or Instagram account because she believes it distracts her from true connection. Like her, I have designed my home so that I am surrounded by the little things that make me happy. A love to drink a glass of red wine in my courtyard in the evening. I have three pairs of favorite pajamas that I rotate, and look forward wearing at night. I love my teal sectional in the family room, even with the cat scratches on the ends. The tile in my master bathtub is chipped but I don’t care because it’s there that I indulge in a bite of chocolate and a hot bath before bed. With these simple things, I am content. Joy comes from surrounding ourselves with the little pleasures in life. It doesn’t come from designer handbags or high end furniture. It will never come from Facebook likes or Instagram followers. Those things leave you empty at the end of the day. Happiness at home comes from designing a life you love, it’s the feeling of sleeping in a pillow and linens you’ve chosen that are just right for you. It’s the shape of your favorite coffee cup. It’s the sound of your child’s laughter as it echoes through the home. It’s your sweet pets (no matter how troublesome they are) and favorite blanket, and the comfort you feel from being at home, in your home, the one you have created. Do me a favor today friends. Share something that brings you the most joy. Tell me how it is that you have designed a life that you love? What are the habits or rituals that make you happy? What sounds or flavors or treasures make you smile? I’d love to know what it is, no matter how random, that makes you feel grateful, content, and happy in your home.
from https://centsationalstyle.com/2018/07/design-a-life-you-love/ At the mention of the word “Fan”, what picture comes to mind? Probably something with three blades hanging from the ceiling designed to cool the surroundings, or maybe a desktop fan? But, a bathroom extractor fan is quite different, generally consisting of many blades, and will most often be used in bathrooms or kitchens and not Bedrooms or living rooms. Bathroom extractor fans are designed specifically for extracting the moist air from bathrooms and come in a range of options and configurations depending on the buyer’s budget, requirements and the size of the bathroom they are to be installed in. Bathroom Extractor Fan Points to Consider
A bathroom extractor fan serves a very serious purpose. Most bathrooms are moist and humid places for at least a small portion of each day, this excessive moisture remains in the air unless the bathroom is well vented, and if it’s not, then a range of issues can occur, including mould, mildew and rot. The primary reason to install an extractor fan is to eliminate the moisture content in the atmosphere and keeps the bathroom dry and well circulated. The bathroom fan can also help eliminate any odours that are frequently produced in bathrooms, making space feel fresh for the next person to use the bathroom. Having an effective extractor fan will greatly reduce the chance of mould or mildew and can also help wooden furniture or fittings from warping. Basically, an extractor fan is a must-have option that can and will prevent serious problems from occurring over time and it will save you money. You may also like: The Best Electric Toothbrush Unless you’re an experienced bathroom fitter, chances are that you know very little about extractor fans, there ratings, options and settings. That doesn’t mean you can’t make an informed decision with a small amount of research. There are some basic features which you should consider when buying an extractor fan:
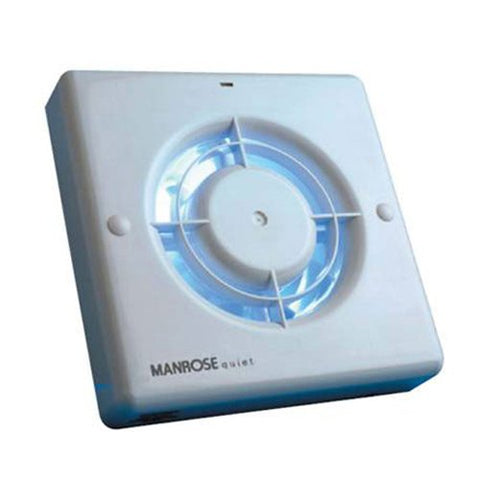
These are the important facts to consider when buying an extractor fan. Now we’ll review our top 10 bathroom extractor fans that are available to buy today. We’ll try and provide details as to why a particular fan is a good choice as well as something to suit every budget and requirement. Manrose QF100T Quiet Extractor Fan
Details
Specs
Our ReviewPros
Cons
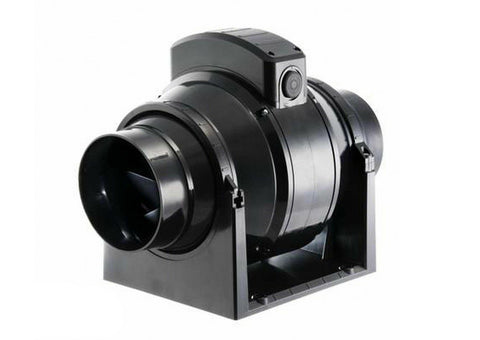
Manrose MF100T Mixed Flow In-Line Extractor Fan – Best In-Line
Details
Specs
Our ReviewPros
Cons
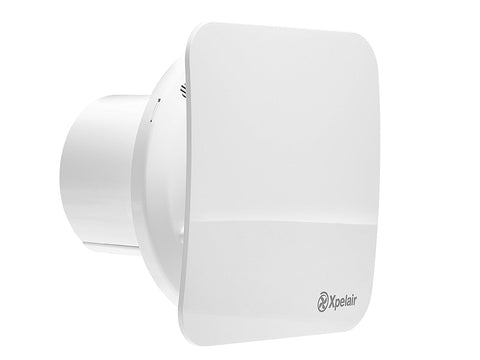
Xpelair C4TS 10.16cm Simply Silent Contour Extractor Fan Timer Delay – Best Overall Buy
Details
Specs
Our ReviewPros
Cons
Xpelair 93225AW 4- Inch Extractor Fan – Best for Budget
This is one of the best extractor fans in the lower price range. If you are thinking of buying a low-cost extractor fan for your bathroom or kitchen then it could be a good option. It has the traditional grill style design with a run-on-timer option.
Details
Specs
Our ReviewPros
Cons
This product does not claim to be one of the best extractor fans in the market. It also does not claim to give you multiple options for your bathroom. The reason I included this product in the list of the best extractor fans list because it is a simple product and delivers on its claim. It simply extracts the moisture in your bathroom and that is an extractors job. You may not get the best quality, but then the price range should be kept in mind. 54% customers in the Amazon have given it a 5-star rating which shows it’s popularity. Therefore, if you live alone and are planning to buy a simple extractor fan in the low budget, then it could be a better option and you can definitely give it a thought. Envirovent SIL100T “Silent” Bathroom Extractor Fan – Best for Larger Bathrooms
Details
Point to be noted: the product comes with the timer option but it will only work with 3 wires+ earth setting. If you have only two connections, this unit will not operate. You should have permanent live+ switched live+ neutral connection to make it operable. (Company statement) Specs
Our ReviewPros
Cons
The best part is its price which is not too high and the performance is quite impressive. All the above extractor fans are the best products on the list. You can choose any of the top products depending upon the requirement and your budget. All the above companies are standard makers of quality product and so that customers have shown their trust in them. 5 Benefits of installing an extractor fanIt doesn’t matter how much we clean our house every day or how much we vacuum carpets and curtains on a regular basis, our home needs constant dusting and cleanliness. The same goes for the most important part of the house i.e. kitchen and bathrooms. Both of the places need regular cleaning as they are responsible for our healthy lifestyle. The kitchen holds lots of heat and smoke while our bathrooms hold a lot of moisture and mould could arise. The bathroom doors could warp out quickly due to damp surroundings and can host a lot of germs and bacteria that is enough to make you sick anytime. The rainy season increases the problem and everyone tries to keep their home absolutely dry. Here comes the role of an extractor fan that not only keeps the surrounding dry but also helps proper ventilation in the room. It controls the humidity of the room – the basic function of an extractor fan is to suck in the moisture and keeps the surrounding dry. The warm air rises up and dry and cool air sink in the room. An extractor installed in the upper part of the wall suck in quickly the warm and wet air and therefore the outside cool air fills the place. This whole process controls the humidity proportion of the bathroom or kitchen or wherever it is placed. It controls the fumes, odours, and heat – A single extractor fan installed in your kitchen can make your cleaning very easy. It also makes one’s health improves a lot gradually. How? Let’s understand. The kitchen while cooking suddenly fills up with a lot of smoke and fumes. The dry and small particle of smoke which can’t be seen with naked eyes enters our lung through breathing. These particles settle down in the lungs and gradually it reduces the efficiency of our lungs. Another problem with the fumes is that it blocks the nostrils; irritate the eyes of children and elderly people. An extractor sucks in the fumes and any odour present in the kitchen and helps you keep yourself healthy in the long run. It helps in keeping the walls and fabric in good condition- if you are in the habit of smoking, then this could be a problem for your house walls and furniture and fabric. The odour of the smoke gets absorbed in your fabrics which can only be eliminated through washing or dry cleaning. The smoking can also make a film of tar on your house furniture, doors, windows, and walls. The black thin film of tar can only be seen when you wash your door, the water could be seen turning into black colour with the tar coming down with water. An extractor helps you to clean the tar every day by sucking in the black smoke in the air and throw it out outside of the room. It maintains the health of your house walls and also makes your expensive cloth go a long way. Isn’t it great? It cools down the kitchen and absorbs heat from the bathroom – The single extractor in your kitchen can actually cool down the room by sucking in the heat generated by light, gas stove and other electrical appliances. It has been discussed enough here that how warm air goes up and the cool air from outside sinks in to replace the hot air. The extractor absorbs the hot air going upside and fills the kitchen with cool and dry air. Absorb smoke – an extractor can be very useful for the area which usually sees the rise of hot smokes from any source like a heated oven and heat chambers. The basements of some areas operating in some hot gases and hot electric appliances being used can use an extractor to absorb the smoke efficiently. This smoke can choke the windpipes of people and can be extremely dangerous. It is always advisable to install an effective extractor fan in areas like this so that any unfortunate happening can be averted. Types of Extractor fansThere are varieties of extractor fans available in the market. You need to have a brief idea about all of them so that you can purchase an extractor that will suit your needs. There are basically three types of extractor fans. The Axial – These are low power fans which need to be ducted at a short distance. It should be installed near the exit point, so that 2-3m of ducting covers the distance. It is suitable for most of the rooms. The centrifugal – These are more powerful in comparison to the above extractor fan. They make noise and due to more power are good for larger bathrooms. The inline – these are the most powerful extractor fans. They are used where there is no direct access to the outside wall. The ducting can go as long as 50m and therefore it is used in the place where the exit option is not easily available. Installing an Extractor Fan
Replacing an Existing Extractor FanIf you do not want to change all the system and you just want to upgrade the current extractor then you must consider some things. The upgrading of the old extractor fan with a new fan will only require simple assembling of the new product. The directions in the manual will be easy enough to understand by a novice. The old duct, wires, and exhaust venting need not be changed, but only reused with the new extractor fan. Make sure that all the ducts, wires and venting hose is in good condition and in good shape. You should also check other little details like the size and dimensions of new extractor fan so that it can be fitted easily with old wires and ducts. But what about the installation of whole new extractor fan? How can it be done?
from Otomo - Blog https://www.otomo.co.uk/blogs/news/best-bathroom-extractor-fan-uk from https://otomouk.tumblr.com/post/176067292793 No Probllama!For my daughter Bailey’s 9th Birthday Party we were inspired by the current trend of llamas and created a party all about these cool animals and even visited a Llama Farm.
A DAY ON THE FARMHere the kids were first given a mini lesson all about llamas: they got to touch different fur and hides, see products made from the llama wool, identify llamas versus other camelids and learn interesting facts about how they eat, and yes, they do spit! We then headed to the barn where we got to feed the llamas and act like ones too – as we were able to stand right next to them in their stalls. Afterwards, we went outside where everyone got turns leading the llamas around. They were really tame so even a few hugs were given! To end off everyone went for a stroll into the fields.
LLAMA NOTESFor the party, we created a Llama themed invitation as well as lots of other matching party printables that you too can use for your llama themed party too. My favourite thing though is the joke regarding the RSVP detail at the bottom of the invitation…
DIY DECORATIONSWhen I plan for any birthday, I have a little list of categories to cover: first up is the “theme”, second the “invitation” and then third is “room decorations”. This is quite a broad category but I try to cover three bases: 1. Wall signs/posters; 2. Balloons/honeycombs etc. and 3. Bunting and Garlands. For Bailey’s Llama Party I decided to do all three, and I have included the free printables here so you too can print and stick them up at your Llama party or just for fun for décor in a bedroom/playroom. To make a quick “frame” sticky tape some thin balsa wood to the top and bottom of the picture. As it is soft wood, I was able to pierce two holes at the top just with scissors and then thread through twine. The whole picture is very light, so I just stuck it to the wall with prestik.
PEG IT UPI love bunting, not so much the stringing it up part… that’s why I’ve learnt to do it early when I’m not on a time constraint and I now just use mini pegs instead of punching and threading it! If you are having a Llama Party, feel free to download, print and cut out this HAPPY BIRTHDAY garland. And the cute cacti garlands I bought from Party Pieces; or now you can even get Llama themed bunting complete with pom pom trim!
TEAM UPWhen I throw a kids party and there are lots of guests, I usually divide the kids into two teams that way we can either rotate the activities from station to station or have them compete against one another for a bit more organisation and team spirit. I make little paper badges to identify who is who – and this was done at the Llama party using the paper party circles for TEAM LLAMA and TEAM CACTUS. These are simply cut out and pinned onto their shirts with safety pins.
LLAMA BINGOAs we were travelling to the Llama farm for Bailey’s birthday, we made these little travel bags for the ride. The canvas bags I found at IKEA and then the pom pom and llama key rings we found at a flea market. We filled the bags with some crackers and gummi bears and then a pen and a LLAMA BINGO sheet. The idea being that during the journey everyone tries to spot the items on the sheet and the first one to cross off all the items on the card (the middle llama one being a freebie) shouts LLAMA and wins a small prize. It was good fun and helped make the time go by quickly.
CUTE CACTIPlanning the table and buffet decorations for the Llama Party ended up being so easy as there were lots and lots of great goodies available this summer in stores. I bought from IKEA real cacti, ceramic cacti, candles and the little colourful tin buckets. Even the little framed postcard of cacti in a standing cork base is from IKEA. I’m not sure where I found the fake cacti plants but those little baby llamas are from the toy store. These props are not only great for a Llama party everything very trendy for summer parties. And last but not least, the easiest way to make a fun decorative centrepiece is to pop a cactus into a tin bucket and add one of these “No Probllama” pennant flags!
PERFECT PAPERWAREParty Pieces really do have the best party supplies and so I was so thrilled that Bailey’s llama party lent itself to their cacti collection. I loved how excited Bailey and Zara were about the cute cacti cake plates, and they matched the cups and napkins perfectly. Other cute table details included printable place cards and water bottle labels – that we made even cuter with the Innocent fruit juices’ woollen hats we collected through the winter! Here are the free printables, if you are keen to set your own llama table.
BONUS: Party Pieces now have a Llama range, which is just the best news ever! TRAIL MIXFor the party, I decided to make my own trail mix and then pop scoops of the snack into little cellophane bags topped with these little free printable TRAIL MIX tags. Cute and so easy to do – perfect for our llama trek in the mountains. I don’t have a proper recipe but preheat your oven to 180 degrees and position a rack in the centre of the oven. In a large mixing bowl, add allsorts of nuts: cashews, walnuts, hazelnuts, pecan nuts and then add coconut flakes, almond flakes and cranberries. Sprinkle some sugar and cinnamon on top. In a small pot over low heat, warm coconut oil and maple syrup and pour over the dry ingredients and mix well. Spread the mixture evenly onto a large baking sheet and bake for 20 minutes or until deep golden brown. The coconut oil will help this granola crisp up nicely, but be sure to watch it carefully as it browns quickly. Once the granola is done cooking, remove from the oven and let cool completely. Store in a container with an airtight seal, and it should keep for a few weeks.
SIPS AND SWEETSOn our buffet, I set a little Sips and Sweets station. Here the kids could get some juice and a little bag of sweet treats. And in the centre was the amazing cake Llama cake. The Llama is completely hand made from sugar – as too the succulent flowers! Best of all it tasted as good as it looks. Here are some free cute little Sips and Treats signs for you to download for your own Llama buffet.
PIN THE TAILI always like to plan a few structured games for kids’ parties. We actually ran out of time so didn’t have a chance to play all of them; but if you are keen here is a little poster and tails for a game of Pin the Tail on a Llama.
STICKER STALKERI found a fun new game that you can play at any type of party: just get stickers to match! Everyone at the party has some stickers and must get rid of all of them by sticking them to the other guests without them noticing. If someone catches you, they can stick one of his/her stickers on you. First one to empty their sticker sheet wins!
CRAFT YOUR OWN CACTIA cute and inexpensive craft is to have the kids make their own little cacti pots. You will need little pots, colourful stones/sand, large pebble stones, different colours of green paint, paintbrushes and a tippex pen. The kids then simply paint a pebble, and whilst they are waiting for it to dry; fill a little pot with small stones or colourful sand. Once dry, they use the tippex pen to paint on some “prickles” and then pop the stone into the little pot. A perfectly “safe” cacti favour for little ones.
PINATA FUNHave you seen the new amazing piñata at Party Pieces that is a llama? This is reason alone to have a llama party!
THE CANDY BAR GAMEI’m always on the lookout for easy and fun games to play at birthday parties for my kids. Especially now that the girls are older, I want some party games that will keep them entertained but aren’t too juvenile for their “cool” tween status. So I was so happy to find this Candy Bar Game online. The kids loved it and I am pretty sure it is perfect for all ages; I know I would jump at the chance to play it! MATERIALS
DIRECTIONSHave everyone sit in a circle; each player is given one candy bar in a sack. The leftover candy bars are placed in the bowl in the middle. Set your timer for ten minutes and start passing the dice around the circle. Each person rolls the die once and depending on what number comes up, they have to follow this chart.
And finally, when the timer goes off, everyone gets to keep whatever candy bars they have collected. P.S. I found this cute sign online so you can print and have it on hand for everyone to see…
DIY DESERT PHOTO BOOTHOne of the fun activities I like to do at kids’ parties is set up a mini photo booth station. This is a good activity whilst kids are arriving as you get to know who they are one-on-one, it breaks the ice and they have a cute party memento to take home. (Trying to take one-on-one photos later on never seems to work as they are all running around having fun!). For a simple set up: I stuck some posters on the wall, set alongside a giant cacti plant and a rustic towel wooden ladder I bought for one of our bathrooms. I then found cute little paper cacti cut outs on sticks and used our No Probllama flag as props. The kids then got to take photos with a mini Fuji Instax, so that way they could immediately have their photo to take home!
FUN FAVOURSIf you are having a Llama Party and looking for party favours, it may be tricky to find llama specific goodies; however the theme lends itself very well to cacti; which are so much easier to track down. Therefore, when planning a specific themed party try and marry it to another colour or icon too, that way if you struggle to find goodies featuring the main character you can bring in the other item for decorations or favours. And then custom favour tags featuring the “hard to find” character can turn most little things into a matching party look!
THANKS SO MUCHOne tradition that I am making sure the girls (and I) do is to write proper paper thank you cards. All their friends design and draw and write such beautiful birthday cards, so this is just a small way that they can show their gratitude, not only for the gift and the presence of their friends at the party – but also to take the time to share in writing their thankfulness for their cards. And, here is the little template we used that you are welcome to print for your own Llama Thank Yous…
For free llama party printables click here. The post Real Party: Llama Party appeared first on Party Pieces Blog & Inspiration. from https://blog.partypieces.co.uk/real-parties/real-party-llama-party/ |

About MeHi I am Albin Adamski from Brynrefail, I am 32 years old. I always surf web for buying antiques for home decoration. Archives
April 2019
Categories |


 RSS Feed
